I love taking advantage of seasonal ingredients in my cocktails, it's a great way to bring freshness and intense flavors to happy hour. It's also a way to bring healthy to happy hour, something that's a large part of my cocktail mission. When I got my hands on some early cherries and some beautiful peaches all I could think of was muddling them in a glass and splashing booze all over them. Everyone else might be thinking pies or fruit salad, but not me, I make a beeline to the bar.
My only problem was what spirit to use. I'd had a particularly long, stressful day and wanted to taste the booze in my drink but still enjoy the tang and sweetness of my ripe cherries and peaches. I waffled back and forth between rum and whiskey, both being good playmates for cherries and peaches, but finally settled on whiskey because it has an effect on me much like a good massage that ends in a gentle kiss. This was exactly what my body and soul needed and just what my two ripe, juicy drupes called out for.
I picked Gentleman Jack because it's a slightly sweeter version of Jack Daniels. With forward notes of caramel and vanilla, a fruity taste on the palate and a soft burn, it seemed a good match for my sweet summer fruits and my mood. Jack did not disappoint, he was a gentleman ... and a heck of an 80 proof masseur.
The
CHERRY PEACH
WHISKEY RICKEY
INGREDIENTS:
2 Oz. Whiskey
8 Fresh Cherries, Pitted, Sliced
Half a Fresh Peach (minus 1 slice for garnish), Peeled, Cubed
I made some candied pecans with my Candied Nutz and as I munched away enjoying the lovely caramelized sugar and great flavor of the toasted pecans I thought, "I wonder if I could get this flavor into a vodka infusion?"
So I grabbed half a cup of the nuts before they got completely gobbled up, snagged a bottle of vodka and got to work. The results were amazing - the infusion captured both the wonderful caramelized sugar and that lovely nutty flavor that really comes out when nuts are toasted.
I made one mistake, I didn't make a large enough batch the first time so I had to go through the whole process again. Don't be a dummy like me, double or even triple the recipe. Trust me, you won't be sorry. And do the same for the Candied Nutz or you'll eat them all up before you make liqueur!
By the way, you can do both recipes with other nuts, like pistachios, cashews and macadamias. I've also done it walnuts but I switched out the vodka for bourbon and used maple syrup instead of sugar for my Toasted Walnut Maple Bourbon.
RECIPE FOR HOMEMADE
CANDIED PECAN LIQUEUR
INGREDIENTS:
1/2 C. Candied Pecans
8 Oz. Medium Quality Vodka
1/4 C. Sugar
TOOLS: Blender, infusion bottle or jar, funnel, medium metal strainer, cheesecloth, coffee filters, mason jar(s).
DIRECTIONS:
Put the candied nuts, sugar and the vodka into a food processor or blender and hit pulse about 5 or 6 times. Don't grind the nuts too small.
Pour this mixture through the funnel into a clean infusion bottle or mason jar.
Label and put it in the fridge to distill, shaking at least once a day.
Check the flavor every few days until you get the flavor strength and mellowness you want. (Mine took about a week before I couldn't resist having a glass but it really hit peak at about a month.)
Strain the liqueur to remove all the bits of pecan from the infusion. I used a large metal strainer for the first step, then, to get rid of the finer particles, I strained twice more, once through cheesecloth and finally through coffee filters.
P.S. Don't throw away the strained out pecans, they're great as a dessert topping.
A Mojito is a classic Cuban beverage made with white rum, sugar (traditionally sugar cane juice), lime juice, sparkling water and mint. It's a tall, lightly alcoholic drink perfect for warm climates and hot summer nights.
Though a Mojito is typically made with white rum, I happened to have a gift of a bottle of Diplomático Reserva Exclusiva Rum sent to me from Venezuelan distillers Destilerías Unidas S.A. This rum had a dark, caramelized, almost whiskey-like oakiness that called out to me for a tart but sweet, flirty fruit partner to soften up and round out the Mojito's bite of lime. There on my counter was a ripe pineapple just waiting to be introduced to that rum. Add a bit of smoky heat to that pineapple to accentuate the brown sugar of the rich rum and cocktail magic was bound to happen.
So that's just what I did, I grilled up some pineapple to muddle in the drink, used the juice from some of the fresh pineapple and reduced it to a simple syrup (in place of the sugar) and garnished with a grilled pineapple wedge. It was all about that fresh grilled pineapple and that beautiful rum being kissed by mint and having a sparkling relationship in my glass!
Grill slices from your fresh pineapple and also some wedges for the garnish. When the pineapple is cooled, cube up the slices for your drink.
Add the grilled pineapple cubes and pineapple simple syrup to your mixing glass and muddle well to release the juices of the pineapple cubes.
Create a spiral from a lime with a channel knife and set aside.
In your Highball glass add the mint and lime juice and gently muddle to release the mint oils.
Strain in the pineapple juice from the mixing glass, add the rum and stir.
Fill this glass with crushed ice.
Top with the soda and garnish.
VIEW RECIPE VIDEO:
* PINEAPPLE SIMPLE SYRUP RECIPE:
1 C. Brown Sugar
(Or 1 C. White Sugar and 4 Tablespoons of Dark Molasses)
1 C. Fresh Pineapple Juice
Bring the sugar and pineapple juice to a boil in a medium saucepan, stirring just until sugar dissolves. Reduce volume by half. Remove from heat and allow to cool. Transfer to a clean jar. You can refrigerate unused portions for up to 3 months.
Salud, and don't forget to splash a bit of your Mojito on the floor for the saints!
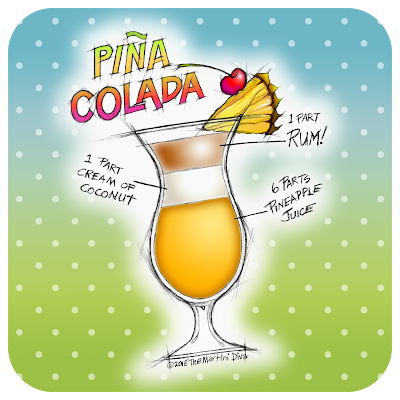
The Pina Colada, Puerto Rico's official national cocktail since 1978, is a creamy, fruity Tiki style drink made with fresh pineaple juice, cream of coconut and rum. Coco Lopez, the original cream of coconut, is said to have been the inspiration for our modern day Pina Colada recipe. Developed by Ramon Lopez-Irizarry, a Professor of Agriculture at the University of Puerto Rico, supposedly Coco Lopez was introduced to bars in 1954 along with blenders and a challenge to use the ingredient in signature cocktails. Therein lies the beginnings of the tales of this tropical Tiki style drink.
Originating in Puerto Rico, there's a lot of folks who lay claim to the creation of the Pina Colada, including a story that attributes the very first recipe to the pirate Roberto Cofresí (El Pirata Cofresí) who was said to drink a concoction of rum, pineapple and coconut milk sometime in the early 1800's.
Modern day versions are claimed by: Ramón “Monchito” Marrero Pérez of the Caribe Hilton in San Juan who was said to have blended up a version using local rum, pineapple, condensed milk and coconut cream sometime around the mid 1950's.
Ricardo Garcia, also from the Caribe Hilton, says he created the Pina Colada when he had run out of coconuts for his signature Coco Lopez cocktail, substituted pineapple juice then served his in a real pineapple shell.
Ramón Portas Mingot also lays claim to the Pina Colada while bartending at The Barrachina in 1963.
The Caribe Hilton's original Pina Colada Recipe (ala Pérez) is 2 ounces of white rum, 1 ounce of cream of coconut, 1 ounce of heavy cream, 6 ounces of fresh pineapple juice and 1/2 a cup of crushed ice blended until smooth and garnished with a slice of pineapple and a cherry.
The Barrachina freezes their pineapple juice and coconut cream instead of adding ice then adds the rum.
My love of the Pina Colada has led me to create a number of my own original Pina Colada style recipes and I'll probably end up doing several more in the future. After all, you just can't beat the combination of fresh pineapple, coconut and rum.
Some classic variations on the original Pina Colada include the Chi Chi which is a Pina Colada with vodka replacing the rum, the Amaretto Colada where the rum is replaced with Amaretto, and the Blue Hawaii where vodka is added with the rum and the coconut us replaced with Blue Curacao.
On July 23rd, 1904 a waffle cornucopia aka The Ice Cream Cone was introduced to the world at the St. Louis World’s Fair.
To celebrate I thought it might be fun to make some booze infused ice cream cones to mark the occasion.
The alcohol infused ice cream cone cupcakes below are really easy. I've used just a simple boxed cake mix and packaged frosting and simply added a few "extras" to them - including a nice little shot of booze.
If you're not as lazy as I am, then by all means, go ahead and use your favorite homemade cake and frosting recipes. The whole key to my recipe is the addition of alcohol by permeating the cupcake itself after baking and drizzling on a little of a complimentary liqueur on top of the frosting. Since I am the ultimate in lazy when it comes to cooking, I stick with mixed but I admire those of you who have the time and energy to bake from scratch.
You can even add more booze by mixing some in with the frosting mixture and adding a little more confectioner's sugar to thicken it up if the liquor thins the frosting too much.
The nice thing about infusing the alcohol AFTER the baking process is 1.) None of the alcohol bakes off, making these a true cocktail cupcake and 2.) You don't have to do all the cupcakes in a batch the same flavors.
AND, yes, this method works for regular cupcakes and mini cupcakes as well, in fact, this method works for all cakes.
Place your ice cream cones into the muffin tins and wrapped coiled aluminum around the base to keep them from tipping over while filling and baking.
Preheat your oven to 350 degrees.
Prepare your cake mix as instructed on the package then fill the ice cream cups only half way.
Carefully place the cone laden muffin tin into the oven.
Bake for 15 to 20 minutes or until a bamboo skewer comes out clean.
Allow cupcakes to cool.
While cupcakes cool prepare your frosting by mixing in the orange zest.
Once the cupcakes are cool take the bamboo skewer and poke about 10 holes into each cupcake cone, being careful not to poke completely to the bottom of the cone.
Slowly and carefully drizzle the Chambord into the holes. Do not pour in too much or it will soak to the bottom and create a soggy cone.
Pipe the frosting onto your cupcakes, drizzle on a bit more of the Chambord onto the frosting, decorate with some fresh raspberries and cute cake decorations.
MORE IDEAS & TIPS!
Try other flavor combinations like:
Lemon cake with lemon zested frosting and drizzled with Limoncello.
Chocolate cake with chocolate cream cheese frosting and drizzled with a home made chocolate liqueur.
Orange cake with lime zested frosting and drizzled with Cointreau, Orangecello or Grand Marnier.
Add some chocolate chips to the cake batter or toss in some rainbow confetti cake decorations.
You can also combine the fruits and chocolate or try spice cake with banana liqueur and some candied nuts on top.
The possibilities are as endless as the kinds of cakes and liquors that are available. You can even create some inspired by any one of my cocktail recipes here on MartiniDiva.com, just type your chosen flavors or ingredients into the search bar and see what comes up.
July 23rd is National Ice Cream Cone Day and July is National Ice Cream Month.
The whole time I was concocting this Pina Colada Cocktail Gel I kept hearing The Pina Colada Song (aka Escape) by Rupert Holmes. By the time I had finished my upscale Pina Colada jello shots I was definitely ready for some on the beach so I created an entire beach scene for my presentation.
FYI, I had 4 of these the day I made them! They were really delicious and refreshing, perfect for a hot day and I was feeling pretty well buzzed after three - but I ate the fourth one anyway! You have to be careful with these - you can eat them like candy but never forget they're loaded with booze!
PINA COLADA
ON THE BEACH
A Pineapple and Coconut Flavored Edible Cocktail Gel
SPECIAL INSTRUCTIONS FOR PINA COLADA GELS:
You will prepare the coconut and pineapple layers separately on this Pina Colada Cocktail Gel.
Start with the pineapple layer first and do the coconut layer last. Save enough of the pineapple gelatin to pour some into your seashell mold.
INGREDIENTS:
Pineapple Layer
1 C. Pineapple Puree
1 C. Pineapple Rum
2 Pkgs. Knox Gelatin
Coconut Layer
1/2 C. Coconut Cream
1/2 C. Coconut Milk
1 C. Coconut Rum
2 Pkgs. Knox Gelatin
GARNISH and PRESENTATION:
Cooking Spray
Brown Sugar
Cocktail Umbrellas
Small Sea Shells, Cleaned
Large Coconut Flakes
Serving Platter
TOOLS:
Measuring Cups
Non-stick Medium Saucepan
Non-stick spoon
8" x 8" Cake Pan
Tropical Themed Silicone Candy Mold
Sharp, Thin Blade Knife
BASIC EDIBLE COCKTAIL GEL DIRECTIONS:
Spray all your molds with cooking spray and set aside.
Measure out all your ingredients and get your tools ready.
Pour your non- alcoholic liquid (juice, water, puree, milks, creams, etc.) into your saucepan, stir well and let this sit for a few minutes.
Place the saucepan on a burner, turn the heat to low and warm the mixture, stirring constantly, until the gelatin is completely dissolved. This takes about 2 to 4 minutes. Do not boil, it's not necessary.
Remove the pan from the burner and, if the recipe calls for a package of dessert gelatin, stir it in.
Next, quickly stir in your alcohol ingredient.
Pour gelatin mixture immediately into whatever mold(s) you plan on using.
Place in the refrigerator to set for at least an hour.
You can then pour on additional layers, if any.
Once all layers are set, you are ready cut, press out with a cookie cutter and/or release the elements of your cocktail gels and plate.
GENERAL SPECIAL INSTRUCTIONS and TIPS for Edible Cocktails:
If you are molding in a cake pan, dip your knife blade in hot water and slide it around the edge of the cake pan. Do the same when you cut out the separate pieces. Use a flat metal spatula to lift your gel out of the pan.
Cookie cutters don't need to be heated and silicone molds do not need to be heated to release either - but don't forget the cooking spray before you pour your gelatin into any mold!
Most cocktail gels can be frozen, depending on the ingredients.
If you're preparing these for a party that will have children present create some without alcohol simply by replacing the liquor with the same amount of a non- alcoholic liquid or puree of a complimentary flavor, BUT be sure to make the non-alcoholic ones look very different from the ones with alcohol.
Here's a great version of a margarita that I blended up to use some leftover berries I had in the fridge. With a couple shots of tequila, those berries were just enough for a couple of delicious cocktails and a perfect end to a long day of painting and remodeling my studio.
Strawberry Blueberry Margarita
2 Oz. Tequila
6 Big Strawberries
1/2 C. Blueberries
2 Fresh Mint Leaves
Juice of 1 Lime
Pinch Lime Salt
1 Oz. Agave Syrup
3/4 C. Ice
Toss it all in a blender, pulse, pour and garnish with a strawberry and sprig of mint and enjoy!